Sunday 13 July 2014

How To Create A Custom Search Engine For Your Website

                It is very important for any website have a search engine. if you have a website that has large or even small content, there are chances visitors to your site will want to search for information in your site, how do you expect them to find such information when there is no search engine in your website. Thanks to Google the search giant, they've made creating search engine for website easy without you doing any learning any programming language or write a line of code.
               
                     To create a search engine that will search your website for a query word or sentence, the use of Google Custom Search Engines (CSE) is by far the easiest, quickest and efficient way. Follow the steps below to learn how to Create A Custom Search Engine For Your Website.

Step 1]

Head over to google CSE and to do so you can search "google CSE" in Google and you can select the first option itself.


Step 2]

Now click on the create custom search engine button.


Step 3]

Enter the addresses of the sites you want your search engine to search.
You can enter entire sites like "computertweaks.in"  OR Specific pages on sites.

Fill the form specifying your website address(s) or URL(s), name and choosing your language then hitting the Create button.


Step 4]

Now after clicking on create button your Custom Search Engine is created.


Step 5]

Click on the Recieve code button to get the code to copy to your site that will add the custom search powered by Google.
You can use the code on your own webpage.


Step 6]

Copy the code.
Now you can paste it anywhere inside HTML where you want it to appear.
I am giving an example to add it to a blog at blogger.com

Go to your blog dashboard: select layout >> Add gadget


Choose HTML/Java Script


 Now Paste the copied code in the content box.
and Save it.


 Now you've successfully added a custom search engine to your blog.

There is a lot you can do now with your custom search engine like customizing the theme that may suite with your blog design, enabling monetization, disable or enable voice search and image search, changing layout and much more. Just navigation through left vertical menu bar while creating your search engine and you can easily do all from there. 

Sunday 11 May 2014

Convert, Resize and Cut videos with VLC Media Player

VLC, the free and open source media player is great at playing media of even the most obscure formats. However, that is not all it can do. It can be used to easily convert videos from one format to the other. Converting videos with VLC media player is pretty fast and is in the league of most premium video converters in terms of quality. It can also be used to resize videos from one size to other for when you need to shrink videos to fit in your mobile devices. It can also serve as a quick video cutting tool.

Convert Videos with VLC Media Player

To convert videos with VLC media player, follow the steps given below:-

1) Open VLC media player.
2) Click on Media in the Menu bar.
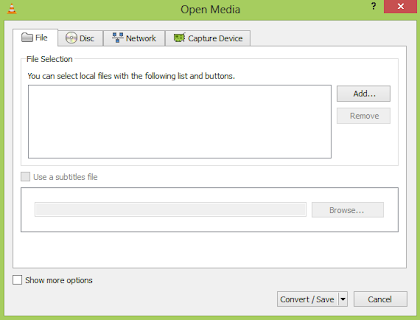
3) In the dropdown menu, click on Convert/Save. Alternatively, you can directly press Ctrl+R to reach media options.

Convert Videos

4) Click on the Add button on the right of the File selection box to load the video whose format you want to change.
5) In the following dialog box, click on browse to select the destination where your converted video will be.

Change Video Format

6) In the profile selection option, select from a pre-configured profile of the output or customize it by clicking on the Settings icon on its right. You can select from a range of encapsulation, video and audio formats in the following dialog box if you wish to customize the output.
7) Click on Start to begin conversion.
8) VLC's progress bar will show progress. Do not close the player when it is converting videos as it will result in output video getting corrupted.

The speed with which VLC converts videos depends upon your computer's specifications. A faster computer converts faster while slower PCs take a lot of time. At the end of the conversion process, you will get the video in the format that you have selected in step 6.

Resize and shrink videos with VLC media player

Resizing the video involves making minor changes in the steps followed in conversion. While customizing the profile in step 6, go to the Video codec tab. Inside the Scale option, enter the desired width and height that you deem fit for your needs. After that, just convert the video as you normally would. This would result in the output video having the same dimensions that you specified. However, it is important to note that exact dimensions would only be achieved if the aspect ratio of the video is maintained. If the correct aspect ratio is not satisfied by your dimensions, VLC will take one of your dimension and change the other to satisfy it.

Resize Videos

Cut videos with VLC media player

To crop videos with VLC media player, go to the menu bar and click on View menu. Inside it, check Advanced Controls. This will result in a few extra buttons over the normal toolbar. Play the video of your choice and press the record button (from the newly added buttons) at the point in the video from where you want to start. Then, again press this button when the video reaches the point at which you want to stop it. The cut video will automatically be saved in your Videos library. It is located at Libraries/Videos in Windows 8.1, Windows 8, Windows 7 and Windows Vista. In Windows XP, it is located at My Documents\My Videos. You can use the Frame by Frame button to get a high degree of accuracy. You need to install the newer versions of this program as older versions do not support this.

Wednesday 26 March 2014

How to create sitemap for Blogger blog – Blogger sitemap XML

A Sitemap is nothing but a list of accessible pages in your website. Sitemaps helps search engines like Google, Yahoo and Bing to easily crawl pages in your site which helps in better index. As a blogger you must create a sitemap so whenever you make a new post search engines can crawl and index them easily. In this post let’s see how to create sitemap for Blogger blog and submitting it to Google webmaster tools and in robots.txt.

Default Blogger sitemap

By default your blogger blog will have sitemap, but the issue with that sitemap is it only shows your recent blog posts (example). A perfect sitemap is that it should contain the list of all you pages so that search engines know the complete structure of your site. Let’s see how to create sitemap for Blogger blog.

How to create sitemap for Blogger

Creating sitemap is very simple and this sitemap works for both self-hosted Blogger blogs and normal Blogger blogs. Just use this (atom.xml?redirect=false&start-index=1&max-results=500)next to your blogs URL. See example below.
http://yourblogname.blogspot.com/atom.xml?redirect=false&start-index=1&max-results=500
Now you have created sitemap for your Blogger blog, but you need to tell search engines about your sitemap so that bots can know your site structure. There are two ways to tell search engines about your sitemap.
1. Showing your sitemap in robots.txt file and 2. Submitting your sitemaps in Google webmaster tools

Adding your Blogger sitemap in robots.txt file

Login to your Blogger blog and go to dashboard >> settings >> search preferences and edit the custom robots.txt. Enable and paste the following text and click save changes. Make sure to change your blog name in Blogger sitemap below.
User-agent: *
Disallow: /search
Allow: /

Sitemap: http://sureyea.blogspot.in/atom.xml?redirect=false&start-index=1&max-results=500
How to create sitemap for Blogger - Blogger sitemap XML
So whenever search engines crawls your site they will access your Blogger sitemap from robots.txt file.

Submitting your Blogger sitemap in Google webmaster tools

Login to your Google webmaster tools and select you website. In your site dashboard click sitemaps below. Now click add/test sitemaps, add your sitemap (just the atom.xml?redirect=false&start-index=1&max-results=500) and submit your sitemap.
How to create sitemap in Blogger blog
That’s it you have successfully submitted your sitemap in Google webmaster tools. Now it’s ready for crawling and indexing. You can find the number of pages crawled and indexed in Google webmaster tools.
Blogger sitemap - Submitting sitemap in Google webmaster tools
If you like then also submit your Bloggers sitemap to Bing webmaster tools.
Hope this helped you on how to create sitemap for Blogger and submitting it in robots.txt and Google webmaster tools. Please leave your comments below.